Lanes
Images run along the top lane. Beneath it sit one or more audio lanes. An item's width is its duration, so the timeline is a picture of what is on screen when.
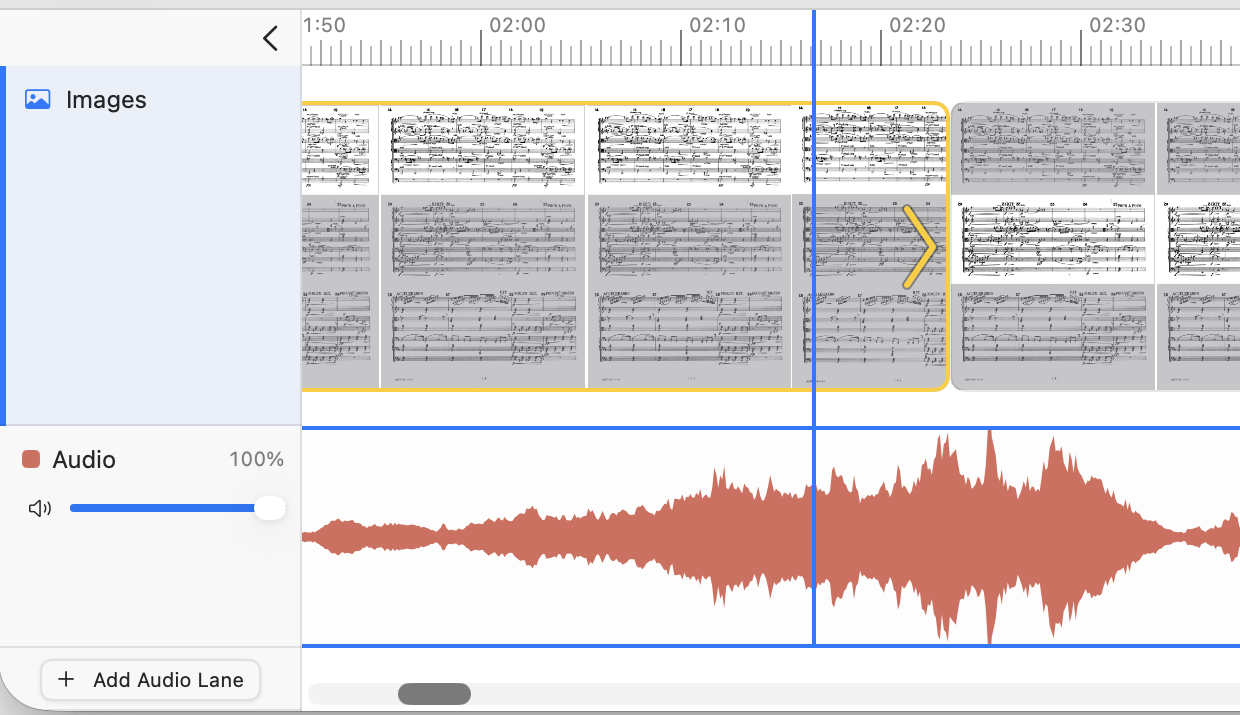
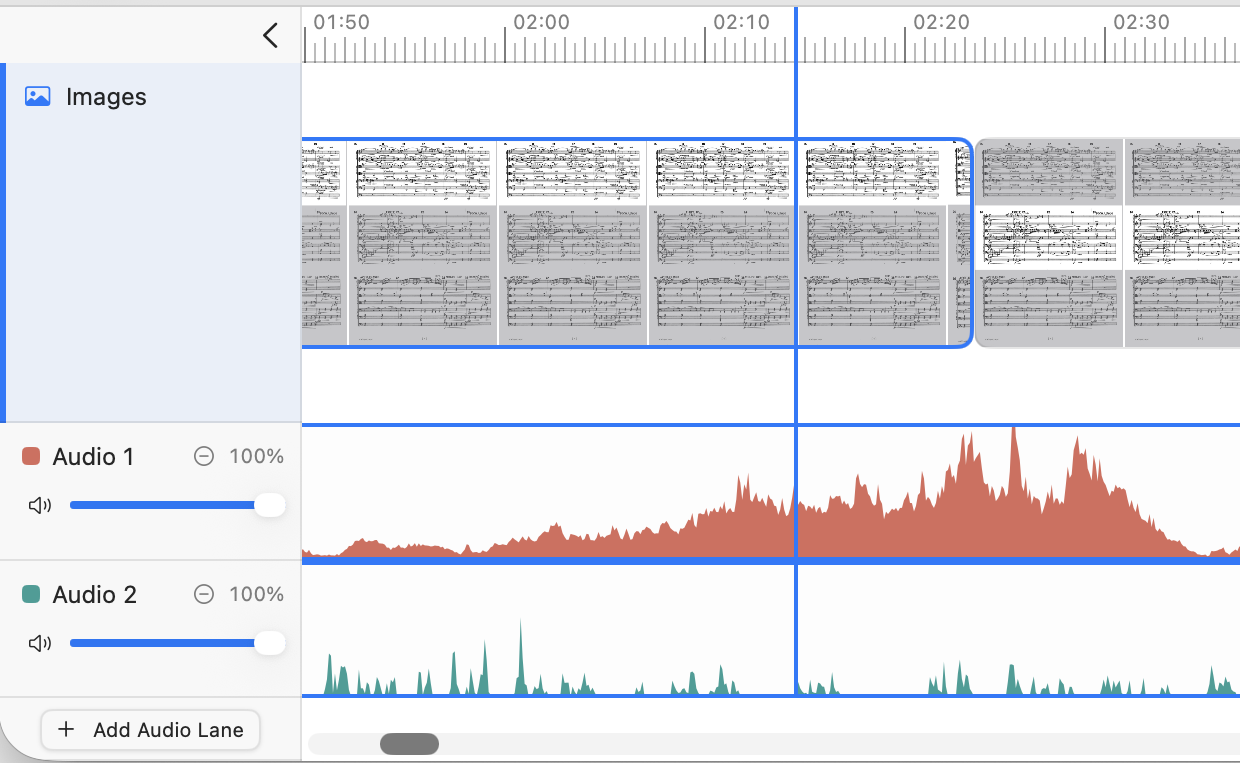
Several audio lanes allow multiple simultaneous sound sources: a narration on one, a music bed on another, effects on a third.
Each audio lane draws its waveform in its own colour.
A waveform is mirrored about the middle of its lane. Settings › Mirror audio waveforms turns that off, drawing the upper half alone and making every audio lane half as high. More on the setting.
The lane controls
Down the left of the timeline is a column with a row per lane, holding what belongs to the lane as a whole. View › Show/Hide Lane Controls toggles it; or use the chevron atop the lane control column.
| Control | What it does |
|---|---|
| Name | Click it to rename the lane. Leave it empty to go back to the name Clapperboard Sync derives. |
| Remove | The minus button. Takes the lane and everything on it. |
| Percentage | The lane's level as a percentage. Multiplies over whatever fades the individual items carry. |
| Mute | Tap to silence the lane without disturbing the level, so unmuting brings back the figure you set. |
| Level | A slider, for setting the percentage. |
Unnamed lanes name themselves: the image lane is Images, a lone audio lane is Audio, and once there are several they become Audio 1, Audio 2 and so on in order down the timeline. A derived name renumbers as lanes come and go; a name you type stays put.
Folded away, the column shrinks to a narrow rail — but a lane that is muted or turned down still shows a dot there, so a lane exporting quietly always has something on screen to say so.
The selected lane
Click a lane's row in the controls column to select it, image lane included. A coloured bar marks the selection.
Commands that could mean any lane act on the selected one, and say which in their menu titles once the project has more than one audio lane — Split Item at Playhead in Audio 2 rather than a silent choice. That matters most for S, which makes the choice without opening anything.
Commands that can only act on sound are slightly different: Split at Chapter Markers, and the two that move the playhead between audio items, go to the selected lane when it is an audio lane and to the topmost audio lane when it is not. They name their lane too, so with the image lane selected the menu still says which lane they will reach.
Adding and removing lanes
Tools › Add Audio Lane, or the Add audio lane button at the foot of the lane controls. New lanes are added at the bottom.
Tools › Remove Audio Lane becomes a list of lanes once there is more than one, so any of them can go from the menu rather than only the selected one. The minus button in the lane controls does the same. A project always keeps at least one audio lane.
Removing a lane takes everything on it along with it. A lane that holds something asks first; an empty one goes straight away. Either way you can undo the removal, and the lane comes back with its items on it.
Which lane something lands in
| Action | Lane |
|---|---|
| Dropping audio on the timeline | The lane under the pointer. Drop over the ruler or the image lane and it goes to the selected one. |
| File › Import Assets | A file picker has no pointer to aim, so with more than one audio lane the menu item becomes a list — pick the lane first. Images always go to the image lane. |
| S — Split Item at Playhead | The selected lane. |
| Tools › Split at Chapter Markers | The selected lane when it is an audio lane, otherwise the topmost audio lane. |
| Move Playhead to Next / Previous Audio Track | The same: the selected audio lane, or the topmost one. |
| Adding a lane | Always the bottom. |
Three modes
The mode switch sits in the controls bar, between the preview and the timeline, beside the zoom slider.
| Mode | What it is for |
|---|---|
| Standard | The normal view. Time runs left to right at whatever zoom the slider is set to. |
| Magnified | The same timeline with the whole zoom range lifted fifteen times higher, for placing a boundary precisely. |
| Reorder | Drops the time axis and lays the items out as tiles of equal size. |
Working in reorder mode
Reorder mode is for changing the order of things, which can be awkward on a time axis where items have wildly different widths, or are very long.
Click to select, ⌘-click to add or remove one, ⇧-click to extend the selection. Drag to move; the neighbours shift to show where the item will land. Delete removes what is selected.
The eye button turns on a preview that follows the pointer, so you can see what a tile holds by hovering rather than by selecting it.
Every lane gets its own band of tiles. A selection stays inside one lane: clicking in another lane starts a fresh one, so a drag can never scatter items across lanes.
The zoom slider is disabled here — tiles are a fixed size, so there is nothing to zoom.
The playhead
The blue line marks where you are. Move the mouse across the timeline and the playhead follows it — and can sound the audio as it goes. During playback, it follows playback time instead, and stops answering the pointer.
The arrow keys move it too; reach for them when you need anything exact — see the shortcut reference for the full set, running from hundredths of a second up to jumping between pages.
⌥⌘G goes straight to an item number or a time.
The playhead readout
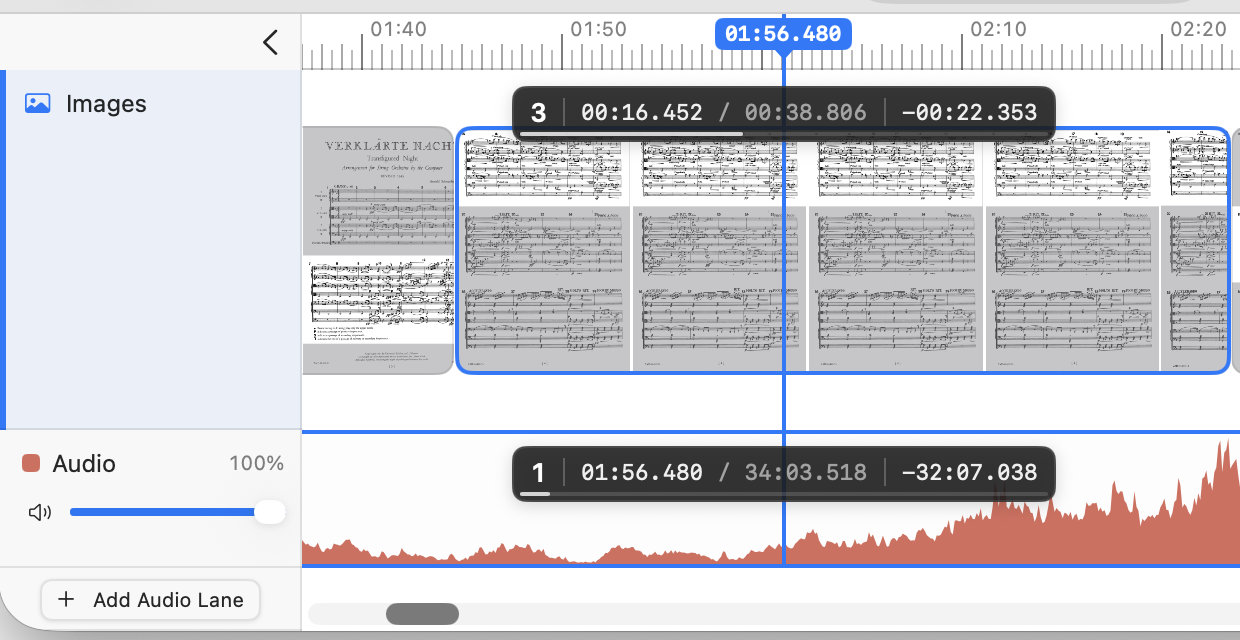
The playhead carries a label telling you where you are in the item you are on. T cycles how much it shows:
| Level | Shows |
|---|---|
| None | Nothing. The line alone. |
| Minimal | The item's number. |
| Concise | Also how far into the item you are, and how much of it is left. |
| All | Also the item's total duration. |
Every lane gets its own, pinned to the top of that lane and centred on the line, so you can read the image position and each audio position at once without the labels covering the frames underneath. Near either end of the timeline the label slides inwards to stay on screen; the line stays where it is. The line itself is always drawn, and the current time rides on a tab at its head, in the ruler.
Hearing the audio as you scrub
With playback stopped, moving the pointer across the timeline can sound the audio under it, the way rocking a tape reel back and forth does. Dragging left plays backwards. Use it to find a word, a downbeat or a breath without playing a passage over and over.
Turn it on with View › Audible Scrubbing. It starts off, the setting is the app's rather than the project's, and the menu item says which state it is in.
The pitch does not move with the speed. Dragging slowly gives you the material slowed down rather than dropped an octave, which makes it usable on music. A pointer that stops moving fades to silence rather than holding a note.
Each lane is heard at its own level, and a muted lane stays silent.
This follows the pointer. Moving the playhead by scrolling the timeline is still silent, and scrubbing is off while playback is running.
How long things last
Drag an item's trailing edge to change its duration. What happens to everything after it depends on the resize mode.
For an exact figure, or to set several items at once, use Set Duration from the item's context menu: it takes a range of item numbers and one duration to give them all.
Cutting an item in two
Put the playhead where the cut belongs and press S — Tools › Split Item at Playhead. The item becomes two, meeting where the playhead was, and nothing else on the timeline moves.
It works on pages as well as audio, and acts on whichever lane is selected. Fades are divided rather than duplicated: a fade-in stays with the first half, a fade-out goes to the second, and nothing lands on the cut itself.
Cutting at an audio file's own chapters
Some audio files carry a chapter list of their own — an M4B audiobook almost always does. Clapperboard Sync reads it when the file is imported and marks the boundaries on the item as dashed vertical ticks. They are a guide only: they do not intercept the drags and clicks that move, resize and select the item.
Tools › Split at Chapter Markers cuts the item under the playhead into one item per chapter. The playhead need only be somewhere inside the item — the cuts come from the file, not from where you are standing — and the whole split is one undo. No audio is copied or re-encoded: every piece refers back to the same file, so dividing a long audiobook costs no extra disk space. The command is dimmed unless the playhead is inside an item that declares chapters.
The toolbar's Audio chapters button lists the markers and moves the playhead to any of them, grouping them by lane when more than one lane carries chapters. It sits beside the Page chapters button, which is a different list from a different place: the book's own table of contents, recovered by syncing to audio.
Setting a boundary at the playhead
Two keys retime the current item against wherever the playhead sits — reach for them when matching pages to a recording rather than typing in numbers.
| Key | Meaning | Moves |
|---|---|---|
| ↓ | End the current item here | The end of the item you are on |
| ↑ | Start the current item here | The end of the item before the one you are on |
Both set the same boundary; they differ in which side of it they move. Holding ⌥ flips the resize mode (cascade or absorb) for that one keystroke without changing the project's setting.
Both keys work while playback is running, which makes this the quickest way to sync anything to a recording: start it playing, listen, and press ↓ at each moment the page should turn. The playhead is wherever the recording has reached, so a whole project can be timed in a single pass without stopping to place the playhead by hand.
Cascading and absorbing
When an item's duration changes, something has to give. The resize mode decides what.
| Mode | What happens |
|---|---|
| Cascading | Everything after the item slides along, keeping its own duration. The project gets longer or shorter. |
| Absorbing | The next item takes the change on itself. Nothing beyond it moves, and the project's total length is unchanged. |
Cascading suits laying a project out for the first time: what you have not timed yet keeps its shape and waits its turn. Absorbing suits correcting one boundary in a project that is already timed, where you do not want a small fix shifting everything downstream.
The toolbar button shows which mode is on and switches it, and it is also under View › Timeline Resize Mode. The timeline signals it where it matters: point at an item, or drag its edge, and that item takes the mode's colour and carries its shape at the trailing edge — a chevron for cascading, a bar for absorbing. At rest the items wear a plain hairline instead, which leaves the colour free to mark the item the playhead is in.
Two kinds of item show no shape even when pointed at. The last item in a lane has nothing after it to move, so both modes do the same thing there and neither mark would be true. And an item too narrow to hold the mark beside its picture goes without rather than have the mark cover the thumbnail — which happens on brief items, and on any item when the timeline is zoomed well out. Zooming in brings the shapes back; the toolbar button and the View menu name the mode whatever the zoom.
Absorbing has one limit, and it applies to dragging: it cannot shrink the next item below a workable width on screen. When a drag would do that, the resize cascades instead, whatever the mode says.
That limit is a width rather than a duration, so zooming the timeline in lets you drag to shorter times. Set Duration takes a typed figure and is not bound by it at all — use it to enter something shorter than dragging will allow.
The item menu
Right-click any item on the timeline.
| Command | What it does |
|---|---|
| Set Duration | An exact duration, for one item or a range. |
| Duplicate | A copy immediately after. Also D. |
| Copy | Copies one or more items to another position. |
| Move | Move one or more items elsewhere, or swap an item with its left or right neighbour. |
| Remove | Deletes one or more items. |
| Insert | An empty item, or an asset from disk, before or after this one. |
| Change Color | Empty items only — sets what colour the gap shows. |
| Transcribe Narration | Audio items only — makes the narration into text on the image lane. More on Text from Narration. |
| Edit Text | Text items only — corrects the words by hand. Also a double-click on the item. |
| Transitions | Fades and crossfades. See below. |
| Replace Asset | Appears only when the item's file could not be loaded, so a moved or renamed original can be pointed at again. |
An empty item is a deliberate gap — a held colour where no image is shown. Useful for a pause before the first page, or a beat between sections.
Transitions
You can fade images, audio and empty items alike. On an image it is the picture that fades; on audio it is the level.
| Transition | What it does |
|---|---|
| Fade In | Eases the item in over the seconds you give it. |
| Fade Out | Eases it out at the end. |
| Crossfade | Overlaps this item with the next, one giving way to the other. Offered only where there is a neighbour to cross into. |
Each takes a duration in seconds, capped at what the item can accommodate, and you can apply each to a range of items rather than one at a time. A checkmark in the menu shows which an item already has, and each has a Remove alongside it.
Curves, on audio
You can shape an audio fade. The curve picker appears only for items on an audio lane — an image fade is always linear.
| Curve | Character |
|---|---|
| Linear | A constant rate throughout. |
| Studio (S-curve) | Eases in and out of the fade, so it starts and finishes gently. The usual choice for audio. |
| Exponential | A perceptually even ramp — most useful on level changes, where linear can sound as though it drops early. |
Partial fades, on audio
Fade In and Fade Out take a From and a To percentage as well, again on audio only.
An audio fade need not run all the way from silence to full: a fade-in from 30% starts partly up and rises, and a fade-out to 40% ducks the track without silencing it — use it to bring music under a narration rather than removing it.
- Keyboard shortcuts — every key Clapperboard Sync responds to.
- Timing a score — the playhead and timing keys for music syncing.
- Export to Final Cut Pro — handing the timeline over as an editable one.